Wednesday, March 13, 2013

The Master Sword Part 2

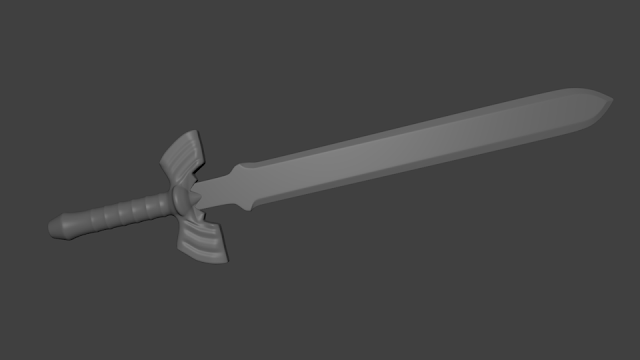
      I started over. The hilt that I was making really didn't have much in the way of detail. So, after thinking it over, I figured out a much better (in my opinion) way of modeling the sword. This isn't the finished product, OK well it might be finished for a bit... But, I want to do custom textures for it. For now though, I give you my version of the master sword from The Legend of Zelda video game series.


     You can see that I really took the time to add some detail. I'm NOT going for a realistic look here. This is just a cartoon style rendering. Later, once I created my own textures for it, I will try for realism. I learned how to do some pretty cool modeling tricks while working on this sword. Most of which were figured out through trial and error. I'm sure there are much better methods in existence that I am not aware of yet, however, it still worked all the same. This item would make a terrible game asset as it has over 5 thousand vertices. and it has a sub surf modifier on it set to 4.


     -Eric

Monday, March 11, 2013

The Master Sword Part 1

     This project is going to be broken down into several parts. I'd like to show how I get my final products. So for inspiration, I went browsing through Google Images. I knew that I wanted to model a weapon... but which one. Then, I saw it, glistening. The Master sword. I always loved Zelda games, ever since I was a little kid, 5 years old I believe.


     This is the image that I am basing my design off of. It is not going to look exactly like this, this is just a reference. I'm going to try to texture the sword using only textures I create in GIMP. This is such a simple model, but I think taking my time and trying to perfect it is going to be a fun time. So let's get started...


     This screenshot shows how I started the sword. I added a cylinder mesh. Using extrude and scale, I shaped the hilt to it's rough shape. Here you can see I still need to add tons of detail, however, this is still just a rough shape.


     Here you can see that I finished the rough shape of the handle and begin to move further up the hilt. Slowly, I make the rough shape of the bottom portion. Extruding, scaling, and rotating each section as I go. This section took me a bit to figure out how I wanted to approach it.


     In this screenshot I have to hilt shaped out, roughly. There is still tons of work to do to refine the shape further. This is before shading it smooth or adding any subsurf modifiers.


     To make the blade, I added a plane to the mesh and shaped out the flat portion of the blade. Then, using extrude I added thickness to the blade. I then placed a loop cut around the perimeter of the edge and scaled/moved it outwards to create an edge/point.


    This is currently what the sword looks like. I've started the process of adding detail. In this render I have a subsurf modifier and smooth shading enabled. Next, on the to-do list, is more detail!

     -Eric

Thursday, March 7, 2013

Modern Gods

     My second logo job. Doing this one for free, well mostly. I get to use some of their music later on for animations/games. Their name, Modern Gods. Check them out! They sent me some ideas and their current logo. My goal here was to spice it up a bit.


     So I took the background logo there and created it in a 3d environment. Then using a Boolean modifier, I cut it out of a plane. I then created the text, using a different font. Gave it some depth and beveled the edges a bit. I made the material and texture for the text so that it would reflect the foreground while letting a tiny bit of color through from the back ground.


     You can see in the above screen shot that there is a white plane hovering just above the camera. That plane is an emitter, which is what the text is reflecting back into the camera. The light in the background behind the black plane is going to be the source of the "god beams" or streaked light coming through the logo. 


     Their old logo was great, this one just pops a bit more. You can see the two lighter stripes on the text. Those are reflections from the plane that I had set up above the camera. I rotated it a bit and added a second plane for more effect. To get the light to shine through like this took a bit of settings manipulation. Once I found the right mixture it was just small tweaks to keep it from being over powering or way too blurry. 


     This item wasn't part of their request, but, I couldn't help myself. I just really wanted to animate a logo. I'm really happy with how it turned out. Some of it was pure accident but it works non-the-less.

     -Eric

Wednesday, March 6, 2013

Local company logo

     As a side job, I recently took a request to do a logo. This is the first logo I've done and the client was really happy with it! Here is the logo that I was given.


     It's pretty good, the tribal fire on the bottom is asymmetrical, which I was asked to fix. I started out by setting up a plane with a mirror modifier on it. Once I got all the parts laid out except the head area, I went ahead and applied the modifier. Then, I got the head mapped out. Now that all the parts are in place, I added material and texture to them. I set up the materials and textures to mimic that of metal that had been painted with a semi gloss. In other words, a little shine with bright colors.


     Here is the result of that work, it's completely flat and it is rather dark as I only have a single lamp on it. From here, what I did was thicken the logo. From flat to about the thickness of it's body section there, roughly. I took a metal floor texture from CG Textures, which if you have not already done so, sign up! It is all licensed resources you can use. I added a very bright light and a displacement modifier onto the new textured floor to create this.


     Now it was time for the finishing touches. I adjusted the shadows that the light throws. There were a bit harsh and too perfect here. So I changed the number of samples and adjusted the softness. Then, to me, the floor seemed a bit to flat, too much like a picture. So I adjusted the displacement modifier to make it seem more like a metal floor with raised sections. The final render turned out better then I expected.


     The floor looks like it is actually there and not just a picture. The shadow looks like it could have actually been cast by this logo and the metal is reflective and distorted enough to be believable. If you have any thoughts, comments, or suggestions, feel free to post them!

     -Eric

Tuesday, March 5, 2013

Paradise on this snowy day.


     This scene was an absolute blast to make. There are several aspects here that I've never incorporated into my work. First of all, some high detail textures, all of which are taken directly from Google Images. I claim no ownership of the textures. Secondly, water! Oh, sweet, translucent, reflective, succulent water. I have not learned how to render water physics yet. This was very simple to create. I made a plane and scaled it to fit the gap between the sand and the background plane. Then I used a solidify modifier to give it some depth. Then, taking the material for the plane, I made it translucent and reflective while giving it a blue hue.


     The first asset I created for this scene was the hut. It only contains 2 shapes, a cone with the bottom face removed and a cylinder with the top face removed and a couple of panels removed to make the opening. I didn't add any thickness to the hut because I was looking to make a semi-real/mostly cartoon scene.


     The palm tree actually took me quite a while to figure out what to do for the leaves. The trunk was easy, just take a cylinder and extrude it a couple of times, then scale it and rotate it how you see fit. The leaves I left flat to save on geometry and also to keep the cartoon look. The leaves were just a plane that I bent and cut to make jagged leaves. Then, it was just a matter of duplicating and rotating to get them into place.


     These are just some different shots of the same scene from multiple angles. I really had a great time working on this scene.

     -Eric

Edit: Looking at the scene I found an issue that I had overlooked. I left the palm trees emitting a small amount of light and they were not smooth shaded. So, making these changes here is the final render! Enjoy, and please feel free to let me know what you think!


Edit 2: Thanks to Masterxeon1001, here is a new final render. He suggested I edit the soft value on my lighting and use the ocean modifier instead of a normal plane. What do you think?


Monday, March 4, 2013

Taking flight.

     Today I decided to work on sky domes. It was relatively simple, the hardest part was finding a good "sky". That's where good ole Google Images came into play. I found a decent one to use. I started off by creating a sphere mesh and then removing the bottom half. Then, adding in a plane to create the ground, I slowly moved the two together so there were no gaps. I added the sky texture to the sphere and then flipped the normal's  creating a dome over the scene which contained the sky and the ground. I then placed a lamp and a camera inside the dome and started working on the grass particles. To break up the ground a bit I used the displacement modifier and then smoothed it out quite a bit. To further break up the ground I created another plane in a different work space. I then subdivided it and smoothed it out. Once again, using the displacement modifier, I created a nice jagged rock. Adjusting the material and texture, so it has some depth, then sub surfacing the rock to smooth it out further. Then it was just a matter of moving it to the first work space and sizing it to fit the scene. I decided I wanted to try to add something else to the scene to make it fun. So I headed over to Blend Swap and found a nice bird made by Spirit. All credit for the bird goes to him. All I did was re-size and move him. All these things combined made this fun little scene for me. Please, if you have any suggestions please feel free to offer them!
   
     -Eric


Friday, March 1, 2013

Our first frontier.

     So, I was a little bored today and decided to play with texture mapping on a sphere. It was a lot easier then I thought. The geometry is simple enough. It's just a sphere and I made a little flying saucer for fun. which was a torus and half a sphere. The stars were created using the world settings.


     Then I proceeded to take screen shots of the renders while moving the camera about for different effect. What I really need to know is, how do I make the geometry not show through the mapping? Also, how do you minimize the reflection of light on the mapping, for example, real earth won't reflect the lamp on it....


     I really liked this little project. I think I would like to work on this a bit more another day. It would be fun to make a solar system animation with the camera zooming and weaving in and out between the planets then crashing into the sun.


     This one, I purposely left the lamp on the other side of the earth to show the "night/day" style picture. Makes it look like the sun is about to rise on this watched portion of earth.


    All in all, I really enjoyed this little project. If you have any ideas or advice on how to solve the issues mentioned above, please let me know via comment!

     -Eric

EDIT:

I got the geometry to smooth out and the light to stop reflecting! woot!


     Much better.