Tuesday, March 5, 2013

Paradise on this snowy day.


     This scene was an absolute blast to make. There are several aspects here that I've never incorporated into my work. First of all, some high detail textures, all of which are taken directly from Google Images. I claim no ownership of the textures. Secondly, water! Oh, sweet, translucent, reflective, succulent water. I have not learned how to render water physics yet. This was very simple to create. I made a plane and scaled it to fit the gap between the sand and the background plane. Then I used a solidify modifier to give it some depth. Then, taking the material for the plane, I made it translucent and reflective while giving it a blue hue.


     The first asset I created for this scene was the hut. It only contains 2 shapes, a cone with the bottom face removed and a cylinder with the top face removed and a couple of panels removed to make the opening. I didn't add any thickness to the hut because I was looking to make a semi-real/mostly cartoon scene.


     The palm tree actually took me quite a while to figure out what to do for the leaves. The trunk was easy, just take a cylinder and extrude it a couple of times, then scale it and rotate it how you see fit. The leaves I left flat to save on geometry and also to keep the cartoon look. The leaves were just a plane that I bent and cut to make jagged leaves. Then, it was just a matter of duplicating and rotating to get them into place.

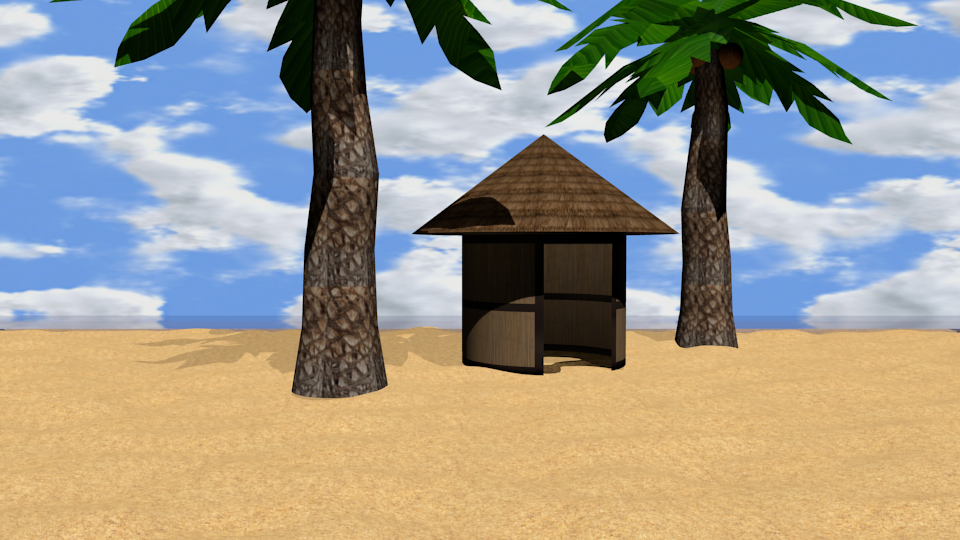

     These are just some different shots of the same scene from multiple angles. I really had a great time working on this scene.

     -Eric

Edit: Looking at the scene I found an issue that I had overlooked. I left the palm trees emitting a small amount of light and they were not smooth shaded. So, making these changes here is the final render! Enjoy, and please feel free to let me know what you think!


Edit 2: Thanks to Masterxeon1001, here is a new final render. He suggested I edit the soft value on my lighting and use the ocean modifier instead of a normal plane. What do you think?


Monday, March 4, 2013

Taking flight.

     Today I decided to work on sky domes. It was relatively simple, the hardest part was finding a good "sky". That's where good ole Google Images came into play. I found a decent one to use. I started off by creating a sphere mesh and then removing the bottom half. Then, adding in a plane to create the ground, I slowly moved the two together so there were no gaps. I added the sky texture to the sphere and then flipped the normal's  creating a dome over the scene which contained the sky and the ground. I then placed a lamp and a camera inside the dome and started working on the grass particles. To break up the ground a bit I used the displacement modifier and then smoothed it out quite a bit. To further break up the ground I created another plane in a different work space. I then subdivided it and smoothed it out. Once again, using the displacement modifier, I created a nice jagged rock. Adjusting the material and texture, so it has some depth, then sub surfacing the rock to smooth it out further. Then it was just a matter of moving it to the first work space and sizing it to fit the scene. I decided I wanted to try to add something else to the scene to make it fun. So I headed over to Blend Swap and found a nice bird made by Spirit. All credit for the bird goes to him. All I did was re-size and move him. All these things combined made this fun little scene for me. Please, if you have any suggestions please feel free to offer them!
   
     -Eric


Friday, March 1, 2013

Our first frontier.

     So, I was a little bored today and decided to play with texture mapping on a sphere. It was a lot easier then I thought. The geometry is simple enough. It's just a sphere and I made a little flying saucer for fun. which was a torus and half a sphere. The stars were created using the world settings.


     Then I proceeded to take screen shots of the renders while moving the camera about for different effect. What I really need to know is, how do I make the geometry not show through the mapping? Also, how do you minimize the reflection of light on the mapping, for example, real earth won't reflect the lamp on it....


     I really liked this little project. I think I would like to work on this a bit more another day. It would be fun to make a solar system animation with the camera zooming and weaving in and out between the planets then crashing into the sun.


     This one, I purposely left the lamp on the other side of the earth to show the "night/day" style picture. Makes it look like the sun is about to rise on this watched portion of earth.


    All in all, I really enjoyed this little project. If you have any ideas or advice on how to solve the issues mentioned above, please let me know via comment!

     -Eric

EDIT:

I got the geometry to smooth out and the light to stop reflecting! woot!


     Much better.

Thursday, February 28, 2013

Springing back to life.

     Sadly, it has been too long. I've been searching for motivation and time to start working towards my goal. Learning all things game design. In my absence I have spent many hours learning and reading about java programming. Neglecting Blender, I decided today to work on a scene that was inspired by the desire for spring. Not that I dislike winter, that is not the issue at all. I just am really looking forward to the joys and outdoor fun that comes along with spring. With that being said... Let's get into the project...


     This is basically the finished project, as it has been a while and I forgot to take screen shots. However, I can still illustrate the process. The first thing I did was created a basic plane. Then using subdivision surface, I made 5 cuts. Next, I took the plane and added a sub-surf modifier onto it. I then created a material for the ground and gave it a dark brown, non-reflective color. Once that was finished I created a texture for the displacement modifier. Now, I don't remember exactly what settings I adjusted to get the rolling hills look. 


     In this image you can see that I cut away the majority of the original plane. This lightens the load on the computer quite a bit and since the audience only sees what the camera sees, then it is not required to have the rest there. Once the displacement modifier was all tweaked, I moved on to the grass. Using hair particles and tweaking the settings once more, I created the rolling grass-covered hills you see here. I will do a more thorough walk through later. Enjoy!

     -Eric


Tuesday, February 12, 2013

Learning Java and playing with Blender

     I have 2 new books on my Nook, both dealing with learning Java. I'm really liking the learning process for Java so far. I mean, it has just been mostly reading and looking at other authors code... but still interesting non the less. I'm starting to develop an idea of what I need to do in order to get things rolling in the right direction this time. I have neglected my Blender training, which I need to get back into.... There is so much I want to do but it seems that everything is being bottle necked by trying to learn as much as I can. I think, with Blender I will just work on modeling on my own instead of trying to continue learning more about it, until a later date. Then, using up my "learning time" on Java.
     I'll start posting some more models here soon, I'm thinking about doing a "Monday, Wednesday, Friday" modeling session. Something small each day to advance my modeling skills. Once I get to where I am modeling quickly and cleanly, I can start to add backgrounds or create scenes, maybe even animate a bit.
     As far as Java goes, I'm thinking that once I start learning to make some programs, I'll get links to them posted here. I'm thinking about doing some coding videos along with the animation videos. Maybe show the code for a simple game and then show the game, with a download link in the description. Could be fun.

     -Eric

Wednesday, January 30, 2013

Shift in focus.

     So, with the lack of interest in a platform game... I'm going to re-devote myself to learning all things game design with a focus on modeling and animation in Blender for the time being. That is where I have to most fun. I think that, maybe, I jumped ahead of myself. I got myself all worked up and excited to start on a game and then was let down by the underwhelming response. Though, looking back, I shouldn't care what happened as it was a project for me (and if it got good reviews, well that is great too). However, it kind of stopped being fun for a bit.
     Now taking a month break and realizing that there is still tons of stuff that I can learn and work on, it gives me new motivation to continue with this blog and with my dream. This blog is still devoted to learning game design, as is my YouTube channel. However, you might see some fun projects sprinkled throughout. Now, with that being said...

         ONWARD!

-Eric

Wednesday, January 2, 2013

More than a walk...

     First of all, I know it is a day late, Happy New Year! Now that the social niceties are out of the way... back to Blender! For the first time in my Blender exploration and execution, I go beyond the normal "walk cycle test". Why, because it is boring. I wanted to see how I dealt with the real world problems, like front flips. Using my Minecraft character from the previous blog post, I created a small little scene for him to play in. Using a basic plane and then subdividing it out about 5 times to create the base for the scene is the path I choose. From there you can pick random faces to extrude for hills and trees. Keep in mind this is just a very basic attempt at Minecraft animation and I hope to make a better one later on. Mostly because the small scene I created doesn't really leave much room for camera work or character movement. I made the scene in a bit of a hurry, sorry, I was excited to get into the animation portion. I promise the next scene will be much better, also, I'll fix the textures there too!


     This was a lot of fun to make and I cannot wait to start working on the next scene. Animation is part of game design, a part which I am truly excited to work on some more. Any thoughts or ideas are always appreciated! Sorry for the short post, but, I'm going back to work with Blender some more! The next post will have some screen shots of the creation process.

EDIT: Just figured out how to fix the shadows not appearing, special thanks to tacodrake95 from the /r/blender community! Sadly, I had already rendered this trial video. The next one will have shadows!
     -Eric